The 7 Keys to a Great Tiny House Foundation
It seems a bit strange talking about foundations for a tiny house build that’s on wheels but that’s effectively what the trailer & floor of our tiny house is – the foundation upon which everything else is built. The main structure of the tiny house itself is built on top & relies on those items being structurally sound. Without a good foundation we risk sagging & creaking floors, walls that move or crack & allow moisture damage & if we really got it wrong the whole build could need to be redone in a few years time.
There are so many options and no real guidelines when it comes to tiny house building. We did a lot of research before our build so here is a run down on how we have constructed our floor, why we chose different options, where we got our information from & what we would do differently. Hopefully it helps someone else make some good choices for their own build.
You can follow our build on social media too!
Our Trailer
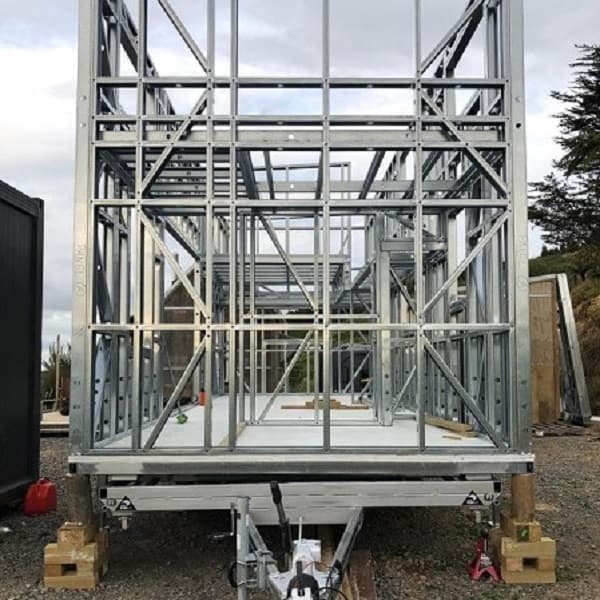
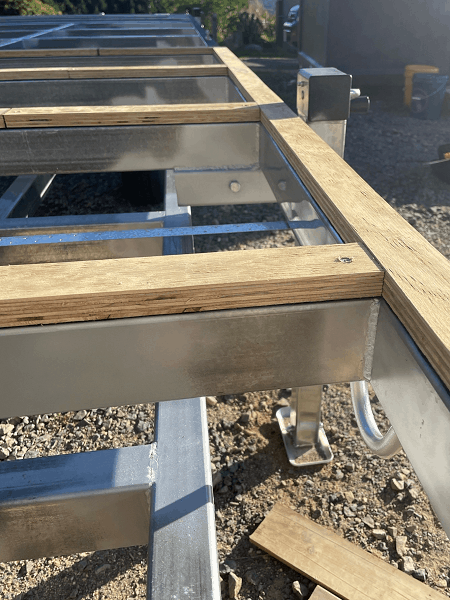
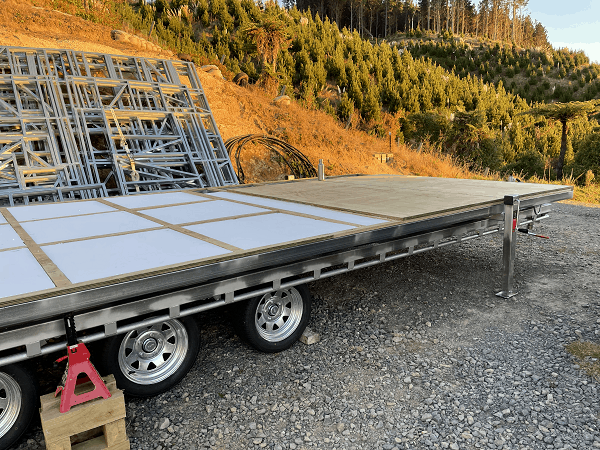
Our trailer is a custom built trailer expertly put together by the team at KiwiAz trailers in Whakatane. It is in two parts – the trailer itself and the tiny house floor which will technically be a load on the trailer.
The trailer itself is 2.5m wide & 7.8m long excluding the drawbar. It has triple axles and mechanical braking. The mechanical brakes mean that we don’t have to be quite so worried about brake maintenance compared with electrical brakes which would need a power supply. The trailer structure is all built with 50mm x 75mm rectangular steel that is 3.5mm thick.
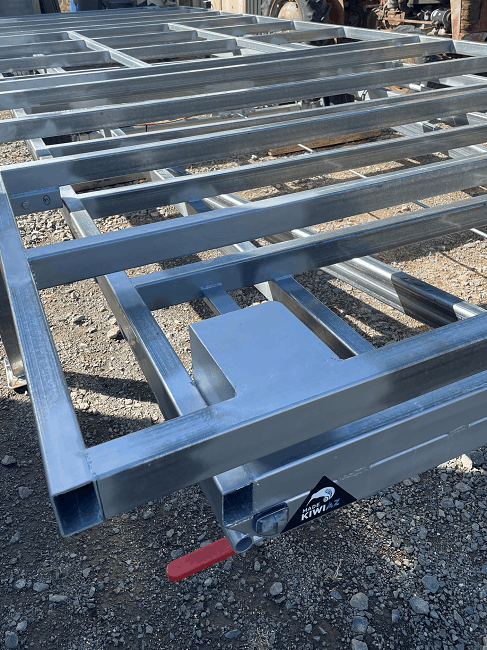

The detachable deck which will be our tiny house floor is 2.9m wide & 7.8m long. The structure is built in 3 sections, most of which is built from the same 50x75mm rectangular steel as the trailer itself. The two end sections have floor joists at 600mm spacing across the width of the floor. The centre section which is over the trailer axles has a grid of steel with 4 of the 50x75mm steel pieces at 600mm spacing running across the width & 2 smaller 50x50mm pieces at 900mm spacing running down the length of the trailer for added strength.
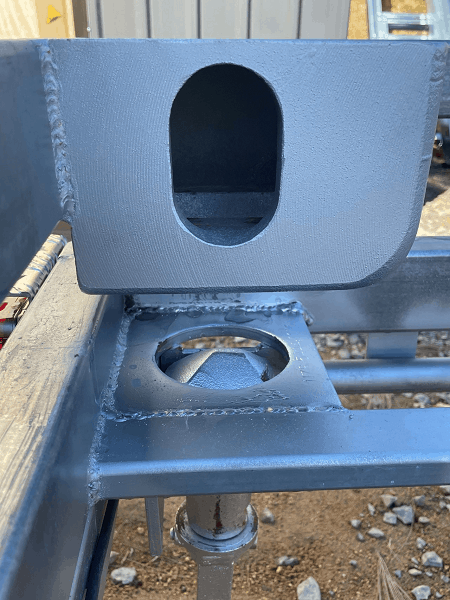
The two components are joined together by 4 container locks, one in each corner. These are the same mechanisms used to hold shipping containers in place while they are being transported. The container bolt housing is located in each corner or the trailer.
There are lifting jacks are located at 1.2m from each end of the floor and we also have tie down loops attached to the floor next to the jacks. The trailer itself has a tie down rail installed along the length of each side giving us plenty of options for keeping the trailer in place.
Building the Sub-floor
We’ve seen a few tiny house builds documented where the floor is simply ply screwed to the trailer. Ours is a bit more complex than that. Thermal efficiency is important to us as it longevity so in addition to the ply floor we also have a thermal break, 90mm thick insulation and a damp proof layer to prevent moisture transferring between building materials. Here are the steps we followed to put our floor together.
#1 – Insulation Support
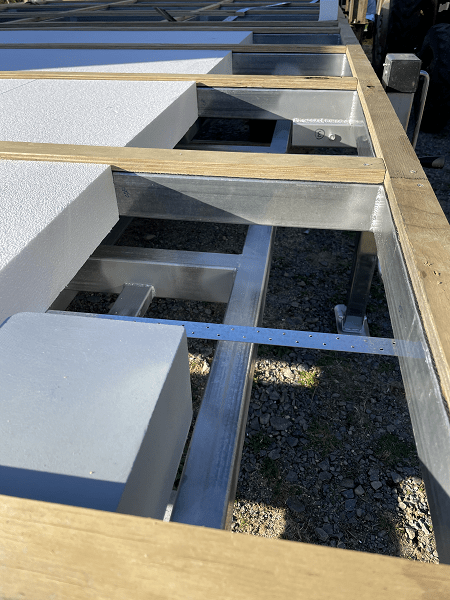
While the insulation does fit tightly between our floor joists, we still wanted to make sure it couldn’t fall out in high winds or during travel on the road. With our floor sitting flush against the trailer & connecting to it in multiple places, we had to think carefully about what we would use to achieve this.
In the end we chose to use steel strapping – the kind used to brace house framing. We already needed to get some to brace one of the walls of our steel frame so getting a bit extra wasn’t a hassle. It is also strong & comes with tensioners to make sure it doesn’t sag. The bracing has been screwed to the underside of our floor deck between joists to support the full length of each piece of insulation.
#2 – Damp Proof Course
Since we have different materials contacting each other in our floor structure, we have installed a DPC (damp proof course) between them. We used this one but there are plenty of options. This stops moisture travelling between the two materials & causing damage. We initially tacked the DPC on with adhesive to hold it in place but eventually it will just be sandwiched between the thermal break battens and the steel floor structure.
#3 – Thermal Break
Reference Material
We’ve seen a bit of discussion around requirements for DPC & thermal breaks in the last little while so here are some of the resources we used when designing our tiny house floor.For a brief run down on thermal breaks, there is this build magazine article but for more detail we found the best source of information to be the NASH (National Association of Steel Framed Housing) House Insulation Guide. While the information is mainly around wall & roof structures, the information applies just the same to steel floors such as those in most tiny house designs.
To save some height but still have a floor that meets insulation requirements, we went with a 19mm ply thermal break batten in our floor. Not super thermally effective but with the addition of another 19mm sheet of ply on top for the actual subfloor and the 90mm thick insulation it still works out to a better than code R value.
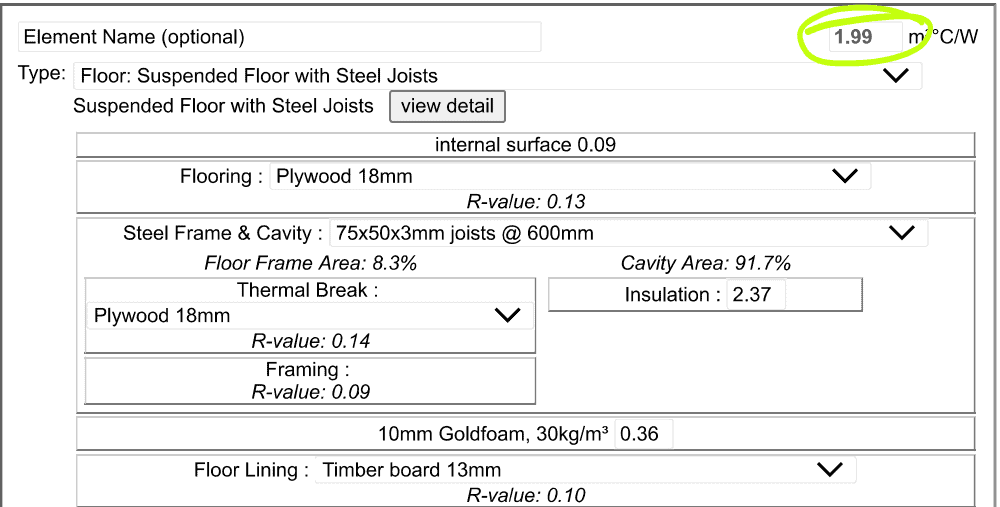
To make things a bit more cozy later on, we will most likely install a thick foam underlay before we install our flooring. Possibly adding another 0.3 to our overall floor R value without adding any height to the house itself.
Choosing ply also saved a bit of cost compared to buying pre-cut batten timber. We simply cut a ply sheet down to 50mm wide strips and screwed them in place with just enough screws to stop them moving around.
#4 – Insulation
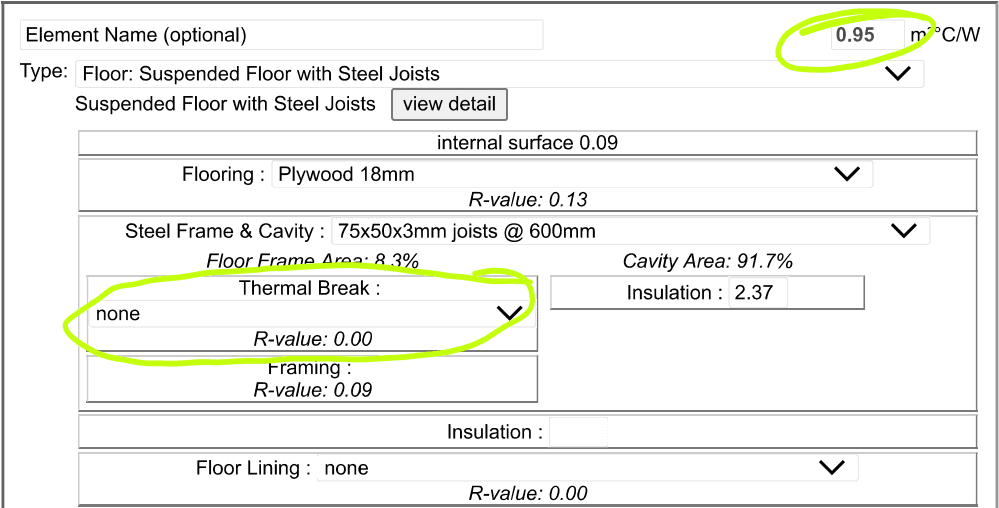
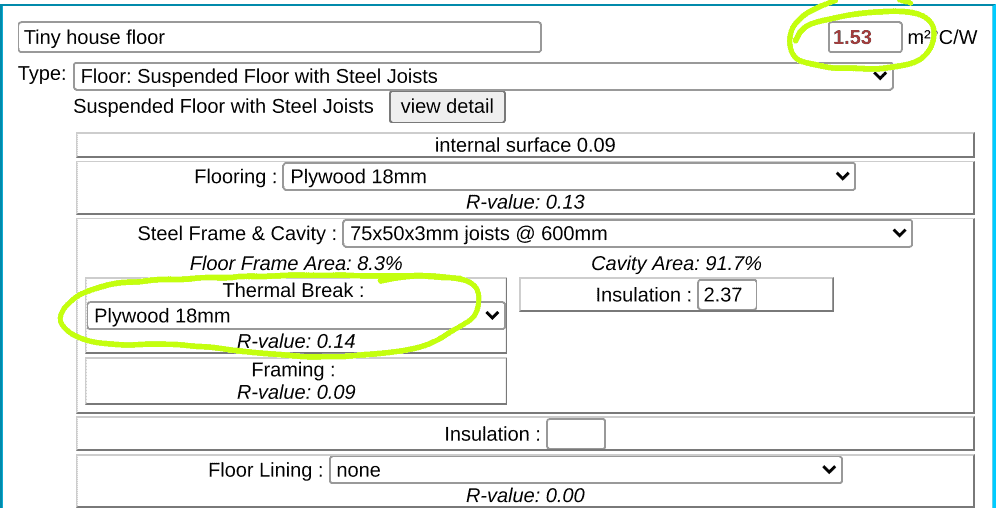
To check our floor & insulation design for compliance with building code requirements, we used the design navigator insulation calculator. We also used this when planning our wall & roof insulation. You can see our preliminary designs for those in our first build post here.
As you can see from the comparative calculations below, skipping the thermal break makes quite the difference to the overall R value. For now our floor will have an R value of 1.53 compared to the current building code requirement of 1.3. Once we add flooring to the inside of the building, our likely R value will increase to a more cosy 1.99.
Cutting the insulation to size was possibly the biggest challenge of the flooring build. The insulation came in 1.2m x 2.4m sheets which needed to be cut down to fit between our 600mm centre joists. After sending bits of polystyrene flying through the air while cutting the first piece, research was done & a new method obtained – a hot knife sounded like it was the way to go.
After a bit of experimentation we found the right combination of knife, heating method & cutting style to slice through the insulation without making it look like it had just snowed! Still not an ideal method but it got the job done without so much mess. We can definitely see why so much insulation comes cut to width!
#5 – The Floor!
Finally after all the prep work, it was time to add the actual floor. 19mm thick treated plywood. Screwed down at 200mm intervals wherever then sheet sat on top of a batten. The screws used were 45mm long – enough to get through 2 layers of 19mm ply & attach them both, plus the DPC, securely to the steel frame of the floor. A bit of walking around on top confirmed that our floor was indeed solid!
#6 – Sealer/Undercoat
We knew that our build would probably take a while & would be exposed to the weather so we took the extra step of painting our floor with a primer/sealer/undercoat just to give it a bit more protection from the elements. Not necessary but something we wanted to do just as a bit of insurance.
Our 7 Key Features
So what are the 7 things we wouldn’t do without when it comes to the trailer & floor for our tiny house?
- The Removable deck – Our site is steep so taking the trailer for a warrant had to mean leaving the tiny house behind. It also allows us to take the trailer out & more easily access the underfloor for construction & maintenance plus change the height of the house if we want to. Having the tiny house as a ‘load’ rather than part of the trailer also means it can be slightly wider. 3.1m total rather than the 2.55m allowed for the trailer itself. Plus we have a trailer we can actually use even once the house is built.
- Quality Steel – Great structural steel that will last the distance. The steel in out floor is 3.5mm thick, 50x75mm rectangular section. We can already feel the difference in the quality of our trailer construction. Not the cheapest option but well worth it for the knowledge we are getting a quality base to work from.
- Tie downs & jacks – Essential for keeping the tiny house stable, getting it level & getting it on & off the trailer. We have 4 heavy duty jacks attached to the house floor for getting it on & off the trailer plus 4 tie downs on the floor. The trailer itself has a tie down rail so we can secure it at multiple points.
- DPC – Steel to timber contact is always an area that can go wrong when it comes to moisture, rust & mould. Having the DPC is very cheap insurance against issues of moisture getting in & damaging our plywood floors.
- Insulation – We want to be warm. Living in cold houses isn’t fun so we have squeezed in as much insulation as we can without added too much height to the build.
- Thermal break – We did have to compromise a bit on this because of height restraints but we’ve got enough of a break between the steel frame outside & the interior of our floor to exceed building code insulation requirements & we still have the option of adding a bit more insulation & effectively more of a thermal break to the inside of the floor if we want to.
- Strong Floor – The spacing of our joists & thickness of the ply floor means that our floor doesn’t move when we walk on it. It feels strong & secure. Reassuring after spending over two years in a cabin that didn’t have adequately sized timber in the floor. No more bouncy floors for us!
So that’s it, a complete run down on how we built our tiny house floor and the features that were important to us. Time will tell whether we got it right. There are already a couple of small things we would do differently next time to make the build easier, but overall we are happy with the result.
If you’ve got any thoughts or questions, let us know by sending us a message or adding a comment below. You can also follow along with our progress on Facebook & Instagram.